Sunday, January 22, 2012

Ummmm YES PLEASE!

So I've been secretly dying to make homemade marshmallows.  As I drooled over the ones other people have made and posted on their blogs, websites, and different bakery postings on Facebook, I decided I was finally going to do it.... Then I procrastinated some more, and a week later, I FINALLY did it!


This was pretty easy, though more of a "picky" recipe and can get pretty messy! Before I started, I had already accepted the fact that this would be a complete disaster and my husband and kids would come home and find me stuck to the kitchen floor, unable to conquer the sticky marshmallow mess I had glued myself down with.


Well to my surprise, this wasn't too hard and didn't end up in complete disaster!! I decided to use Alton Brown's recipe for marshmallows, and followed every step to a T - which I think is completely necessary if you are to successfully make these! Obviously since I'm a s'mores freak, I had to dress some of these babies up :)  The marshmallows are DIVINE - and the melted chocolate and crushed graham crackers are not only FABULOUS but look adorable as well!

Now that I know I can do it, I'm psyched to make different flavored and different colored marshmallows! Including different cut-out shapes and sizes! :)

ENJOY!


3 packages unflavored gelatin
1 cup ice cold water, divided
12 ounces granulated sugar, approximately 1 1/2 cups
1 cup light corn syrup
1/4 teaspoon kosher salt
1 teaspoon vanilla extract
1/4 cup confectioners' sugar
1/4 cup cornstarch
Nonstick spray

Place the gelatin into the bowl of a stand mixer along with 1/2 cup of the water. Have the whisk attachment standing by.

In a small saucepan combine the remaining 1/2 cup water, granulated sugar, corn syrup and salt. Place over medium high heat, cover and allow to cook for 3 to 4 minutes. Uncover, clip a candy thermometer onto the side of the pan and continue to cook until the mixture reaches 240 degrees F, approximately 7 to 8 minutes. Once the mixture reaches this temperature, immediately remove from the heat.

Picture From candy.about.com - my camera battery was dead during this step :)

Turn the mixer on low speed and, while running, slowly pour the sugar syrup down the side of the bowl into the gelatin mixture. (Try not to drip any of it outside of the bowl - it becomes very sticky and hard to clean!) Once you have added all of the syrup, increase the speed to high. Continue to whip until the mixture becomes very thick and is lukewarm, approximately 12 to 15 minutes.


 Add the vanilla during the last minute of whipping. While the mixture is whipping prepare the pans as follows.

For regular marshmallows:
Combine the confectioners' sugar and cornstarch in a small bowl. Lightly spray a 13 by 9-inch metal baking pan with nonstick cooking spray. Add the sugar and cornstarch mixture and move around to completely coat the bottom and sides of the pan. Keep the remaining mixture to the bowl for later use.

When ready, pour the mixture into the prepared pan, using a lightly oiled spatula for spreading evenly into the pan. (This absolutely did NOT work for me!! After fighting with the spatula, I ingeniously took a plastic sandwich bag, put my hand in it, sprayed some cooking spray and rubbed it around the whole bag, so the entire thing is nonstick. Worked like a gem!) 


Dust the top with enough of the remaining sugar and cornstarch mixture to lightly cover (I spread it around so there was no "shine" on the top). Reserve the rest for later. Allow the marshmallows to sit uncovered for at least 4 hours and up to overnight.

Turn the marshmallows out onto a cutting board (It probably won't pop right now... I peeled it from one side to the other no problem - it's not fragile, just stretchy!) and cut into 1-inch squares using a pizza wheel dusted with the confectioners' sugar mixture. (Or cut into your favorite shape!) 


Once cut, lightly dust all sides of each marshmallow with the remaining mixture, using additional if necessary. Store in an airtight container for up to 3 weeks.


For miniature marshmallows:
Combine the confectioners' sugar and cornstarch in a small bowl. Line 4 half sheet pans with parchment paper, spray the paper with nonstick cooking spray and dust with the confectioners' sugar mixture.

Scoop the mixture into a piping bag fitted with a 1/2-inch round piping tip. Pipe the mixture onto the prepared sheet pans lengthwise, leaving about 1-inch between each strip. Sprinkle the tops with enough of the remaining cornstarch and sugar mixture to lightly cover. Let the strips set for 4 hours or up to overnight.

Cut into 1/2 inch pieces using a pizza wheel or scissors dusted with the confectioners' sugar mixture. Once cut, lightly dust all sides of each marshmallow with the remaining sugar mixture and store in an airtight container for up to a week.

Now this is where I took them to the next level...... I crushed up some graham crackers, melted some chocolate, and put the marshmallows on a stick. 


I dipped the top of the marshmallows in melted chocolate, then dipped in the crushed graham crackers.... 


OHHHHH YEAH!


DELISH!!!!!!!!!

Monday, January 16, 2012

Chocolate and Peanut Butter? Yes please!

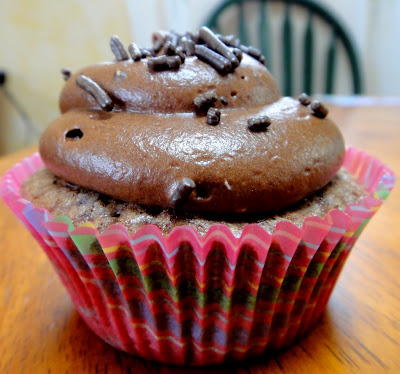
Who doesn't like chocolate and peanut butter?? I know I do!! What I did here was make chocolate cupcakes (tried a new recipe), fill it with a peanut butter filling, and made two frostings... chocolate buttercream and peanut butter buttercream and mashed them together in my pastry bag and made purdy swirls! :) Of course I topped them with a mini Reese's cup... Apparently they were extremely good and went fast at our football party!!


Swan's Down Ultimate Chocolate Birthday Cake
I got about two dozen cupcakes! Full almost to top of liner :)

Ingredients
1 ¾ cup Swans Down Cake Flour (Any cake flour will do)
¾ cup unsweetened cocoa powder (I used about a cup) 
1 ½ teaspoons baking powder
¾ teaspoon baking soda
¾ teaspoon salt
1 cup sour cream
1/3 cup water (I boiled mine)
2 ½ teaspoons vanilla (I used 1T)
2 sticks (1 cup) unsalted butter, softened
1 1/3 cups firmly packed light brown sugar (I used a cup of brown, and 1/3 cup white sugar.. I ran out of brown sugar :P)
3 large eggs (Always at room temperature when baking cupcakes!)

Preheat oven to 350 degrees F. Line cupcake tins with paper.

In a bowl mix together flour, cocoa powder, baking powder, baking soda, and salt. In a small bowl whisk together sour cream, (boiled) water and vanilla. In a large bowl with an electric mixer beat together butter and sugar until light and fluffy. Beat in eggs, 1 at a time, beating well after each addition. Add flour mixture to butter mixture in batches alternately with sour cream mixture, beginning and ending with flour mixture and stirring until batter is blended well.

Divide batter among muffin cups. Bake in middle of oven 25 to 30 minutes (mine took 18-19!), or until a tester comes out clean. (My method is to press down on them until they spring back up) Cool completely.

After they cooled I took a melon baller and scooped out holes for filling - I decided not to use my awesome filling pans this time :)

Peanut Butter Filling

1 cup peanut butter
1 cup confectioners' sugar
1/4 teaspoon salt
Milk if needed

Beat together peanut butter, confectioners' sugar and salt. Depending on the consistency you want, I ended up adding a little milk to make it "creamier". I added tbsp of milk at a time until I got right consistency for what I wanted, about two or three. I put this in a small plastic bag - then just cut off the tip and fill the cupcakes when they're ready.

Peanut Butter Buttercream
1 1/2 cups confectioners' sugar
1 cup creamy peanut butter
1/2 cup unsalted butter, at room temperature
1 tsp pure vanilla extract
1/2 tsp salt
1/3 cup milk

Place the confectioners' sugar, peanut butter, butter, vanilla, and salt in the bowl of an electric mixer fitted with a paddle attachment. Mix on medium-low speed until creamy, scraping down the bowl with a rubber spatula as you work. Add the cream and beat on high speed until the mixture is light and smooth.
Cream butter until smooth. Add peanut butter, vanilla, and salt, and beat until fluffy. Add confectioners’ sugar a little at a time (makes less of a mess) until buttercream is light and fluffy.  Add milk a little at a time to achieve your desired consistency.

Chocolate Buttercream
3 cups confectioners' sugar
1 cup unsweetened cocoa powder
1 1/2 sticks butter
2 tsp. vanilla extract
1/8 tsp. salt
Up to 1/4 cup milk

Cream butter until smooth. Add cocoa powder, vanilla, and salt, and beat until fluffy. Add confectioners’ sugar a little at a time (makes less of a mess) until buttercream is light and fluffy.  Add milk a little at a time to achieve your desired consistency.


"Paint" vertical lines of the peanut butter buttercream on the inside of your pastry bag. This is sort of an example from someone else - they painted frosting coloring gel, but do the same thing with your PB buttercream, just thicker :)

Once you have done that, try not to let the sides of the pastry bag touch - now spoon in your chocolate buttercream like you would normally do and squeeze out frosting until desired swirl starts coming out of the pastry bag. 

I used a large french tip to do my swirl on these. Came out great!


Happy baking!


Tuesday, August 9, 2011

Yummy Red Velvets!

My dear friend and someone who runs my store with me had his birthday at the end of June, and I made his favorite - Red Velvet with Cream Cheese Frosting! Always a hit, always delicious, always so pretty :)


Sunday, June 26, 2011

Banana Split Cupcakes for my Chloe on her 3rd Birthday!

I have been drooling over this idea for about a year or two, and finally made them! They were AWESOME! How adorable are these?!?!?  Banana infused cupcake with fresh strawberry and pineapple filling, and a light vanilla buttercream.  Topped with chocolate ganache drizzle, and of course sprinkles and a maraschino cherry!! These were so fun to make, and so delicious, and SO impressive!!! :) My favorite so far!!


Friday, June 24, 2011

Strawberry Shortcake for Father's Day!

As requested by my husband, we made Strawberry Shortcake for Father's Day! It was so pretty (and delicious, too!).  Kinda makes you want to lick the screen, not the spoon... :)


Friday, June 10, 2011

Cupcake Lollipops!

How adorable are these lollipops?!  I found them at a local convenience store! Someday soon I will give them to my kids, as soon as I stop admiring them!

Memorial Day Cupcakes!

Happy Memorial Day!! :) Thank you to all of our troops who have given their lives in the service to protect our rights, freedoms, and our country.


Colorful Cupcakes!

These were so much fun to make! Lots of different bowls to color everything differently, but fun!! Just take your vanilla cake batter, dye them 3-4 colors in separate bowls, and mix them up in the cupcake liners! Then dye your frosting different colors, and add them to your pasty bag in intervals and squeeze away! The frosting will eventually make the rainbow colors like below. Enjoy!


Thursday, May 19, 2011

Monkey Baby Shower Cupcakes!

One of my best friends had her baby shower this weekend, and of course I made cupcakes! Her theme is monkeys (she's having a girl!) and I did a pretty good job on them I think!


Thursday, May 5, 2011

Easter Cupcakes!

Made some Easter cupcakes for our family get-together... Of course they were carrot cupcakes (great recipe from Buddy from Cake Boss!) with cream cheese frosting, piped like Easter grass with candy eggs on top :) Another declicious recipe! I think I could scarf down cream cheese frosting all day, every day, for the rest of my life!!

Not the best pictures from my iPod, but I can't remember which computer I put the real pictures on.. lol...


Wednesday, March 30, 2011

Yummy Buttermilk Honey Bread!

So I had a sudden urge to make some homemade, braided bread on Monday... So I did! Found a great recipe from Annie's Eats! You can find the recipe here.


Wednesday, March 23, 2011

ANGRY BIRDS!

Okay, Angry Birds is like crack for your iPhone (or iPod, or now Droid).... I don't know how addicting crack is, but if it's anything like this.... Anyway, enough about crack. LOOK AT THE CUPCAKE TOPPERS!

Chocolate Peanut Butter Cupcakes!

I was craving chocolate for about a week before I made these! (Although I love to bake, my sweet tooth only comes out every once in awhile! I usually bake and give away!) I decided to mix chocolate and some saltiness with peanut butter, and I ended up with Chocolate PB Cupcakes. YUM!! These were gone in two days.... Sadly, I might add... Made them again (but with Buddy's Chocolate Cake Recipe from my new book!) for a friend who told me all she wanted for her birthday over the weekend was a cupcake.... and she got pie..... BOOO!!! Her husband is fired! :)


Oh CAKE BOSS! Love this guy! I won his signed book through Cupcakes Take The Cake! Not only does this have his entire life history in this book, but it also has great recipes, techniques, ingredients, and more! I already made the Chocolate Cake (turned into cupcakes) and plan on doing more soon! :) They were fantastic!!

THANK YOU CTTC!!


Thursday, March 3, 2011

Valentines Cookies!

A little late posting this, but I made adorable Valentine's Day sugar cookies for my girls to take to daycare! This is my second time trying to flood cookies, so I'm very novice with it, but these did turn out fairly good. I finally got the correct tip to outline the next batch, and I think I can go wider with the outlining and flood a little more, but in the meantime, I'm learning :)

Rock and Roll!

Now for my daughter Morgan's birthday this year, we had a ROCK AND ROLL party! I made vanilla and chocolate cupcakes, with hot pink vanilla and dark chocolate frosting... Topped them with handmade dark chocolate music notes and gold sprinkles! YUM!


Army of Hello Kitty's!

My neice Peyton's birthday party was this past weekend, and I was told to make Hello Kitty cupcakes! AWESOME!! They turned out fantastic, and they were SO cute! There were vanilla and PB cup filled chocolate cupcakes with vanilla and chocolate frosting... I make some Marshmallow Fondant and used a tulip cookie cutter to make the Hello Kitty heads, just had to cut off the stem and middle part of the flower to make the shape of the Hello Kitty! So cute!! Happy Birthday Peyton!!!